
With the ever-increasing need for the “work from home” model, our reliance on video conferencing has increased at an exponential rate. Unfortunately, this has also highlighted the security shortcomings of popular conferencing tools. Today we talk about managing security controls for Zoom.
Protecting Your 'Tribe'
Not only do the security implications affect the biggest names in every vertical and industry, but they also affect the “little guy/gal” at home, too. Zoom has become the de-facto standard of how we socialize with friends and family, visit doctors, interview for new jobs, or have children attend school via Distance Learning.
One of my wife's Facebook friends has correctly pointed out that on large Zoom meetings, the Gallery view looks like this screenshot from The Muppet Show opening theme song. #muppets pic.twitter.com/GAzbou4iYa
— Mark Yarema (@mcyarema) May 17, 2020
Whatever the circumstance that is driving you towards video conferencing, it’s important to highlight the security aspects of these tools. Today I’d like to discuss three specific areas all Zoom users should be concerned with:
- Meeting Passcodes
- Waiting Rooms
- Account Authentication
There are others, but for me, these are the minimum settings to enable, to avoid unwelcome guests. Unfortunately, “Zoombombing”, a form of online trolling, is a real thing. Or if you do invite a guest that isn’t suitable for the audience, you can easily remove them using Waiting Rooms.
Let’s discuss what these settings are, how to enable them, and how to detect when users change them.
Meeting Passcodes
In today’s world, we all recognize how important pin codes and passwords are and their function in our lives. The Zoom application can help keep things secure by automatically assigning a new passcode every time you create a new meeting. Manually enabling this setting is straightforward. Here I’ve logged into my Zoom account and on the left-hand side of a “Settings” option on the menu. If you click on that, the third and fourth options are the items we’re concerned with from a passcode perspective:

You’ll notice here that I have enabled passcodes for scheduling new meetings, as the selector is highlighted in blue. For the sake of clarity, I currently don’t have passcodes enforced for instant meetings; hence it’s gray. After clicking on the selector on the right, it will slide to the right and enable this feature for you. It’s that easy to enable passcodes for your Zoom meetings.
How does this help? The passcode function stops any random person from joining your meeting. This is step one in ensuring that your meeting is only being attended by those who are invited.
Waiting Rooms
What is the “Waiting Room”? Essentially it’s like going to your doctor’s office. You check in with the front desk informing them of who you are (authenticating who you are and authorizing your visit, usually with payment), and then you take a seat in their waiting room to be called upon for your visit.
Zoom operates in the same way. You open your browser or app, put in your name, meeting id, and the password, as discussed in step 1, and then you virtually step into the Waiting Room until you are allowed entry into the meeting. The host of the meeting can bring you into the meeting or push you back to the Waiting Room as needed.
If the meeting credentials are shared for any reason, the host has the ability to remove a participant until they determine the eligibility of that participant to attend the meeting.
There are various other purposes for the Waiting Room. For example, an instructor may need to speak to a select few individuals and therefore pushes the others to a Waiting Room until they are ready to readmit them back into the meeting. There are other ways to accomplish this as well, and I’d recommend reading up on “Breakout Rooms” for enhanced features.
It’s just as easy to enable Waiting Rooms as the Meeting Passcodes.
If you head back into your account, under the Settings menu again, the first two options are related to the Waiting Room:

By enabling this, all of your participants will be in the Waiting Room by default in every meeting that you host going forward. By default, all participants will be placed in the Waiting Room and you can configure the settings for this, add your company logo, etc by clicking on the “Edit Options”.
To utilize the Waiting Room, simply click on the slider on the right-hand side to enable/disable.
What is the benefit? If a participant decides to not be co-operative, is being rude, or it’s simply time for them to leave your meeting, this gives you a way to remove them from the meeting instantly without having to explain/justify your decision. As mentioned earlier, Zoombombing became a problem, and the Waiting Room is one mechanism to interrupt the interruption. This is step two in ensuring that your meeting is only being attended by those who are invited.
Zoom Account Authentication
The last method worth mentioning is the ability to force users to authenticate themselves with Zoom itself. This is the third mechanism in ensuring that the attendees to your meeting are invited and that they are who they say they are. There is no bulletproof system, but by utilizing these three features, we are giving ourselves the best chance to ensure that we know who our attendees are, that they are meant to be there and that we can remove them as needed if we’re unsure.
The Zoom Account Authentication feature means that users must sign in to Zoom as an authorized and authenticated user before being admitted to the meeting. Within the Settings menu, the ninth, tenth, and eleventh options are where we configure these:

So what are the benefits? By enabling these features, you are forcing all users to have a Zoom account, and they must sign in before attending the meeting. If I have looked at your calendar, I can copy the meeting id and password (usually in the form of a URL) and directly join your “M&A Meeting” scheduled for 4 pm today, and chances are you won’t even realize that I’m there. However, if you enable the Waiting Room, you will have to admit me, and as I am joining as an invitee from your calendar, you probably won’t think twice about admitting me to the meeting. But I can’t authenticate myself as another person easily as you’ve enabled the Zoom Account Authentication option.
This is step three in ensuring that your meeting is only being attended by those who are invited.
So now you have an idea of how to be smart with your meetings and invite the participants that you want there, be able to remove as needed and feel a little more satisfied that you are doing the right thing.
Security Automation for the Win
My question for you is this: Are all of your employees following the same guidelines or policies? How do you check? How often? And what happens when an employee turns it on to satisfy your enforcement and then disables one or more the next day?
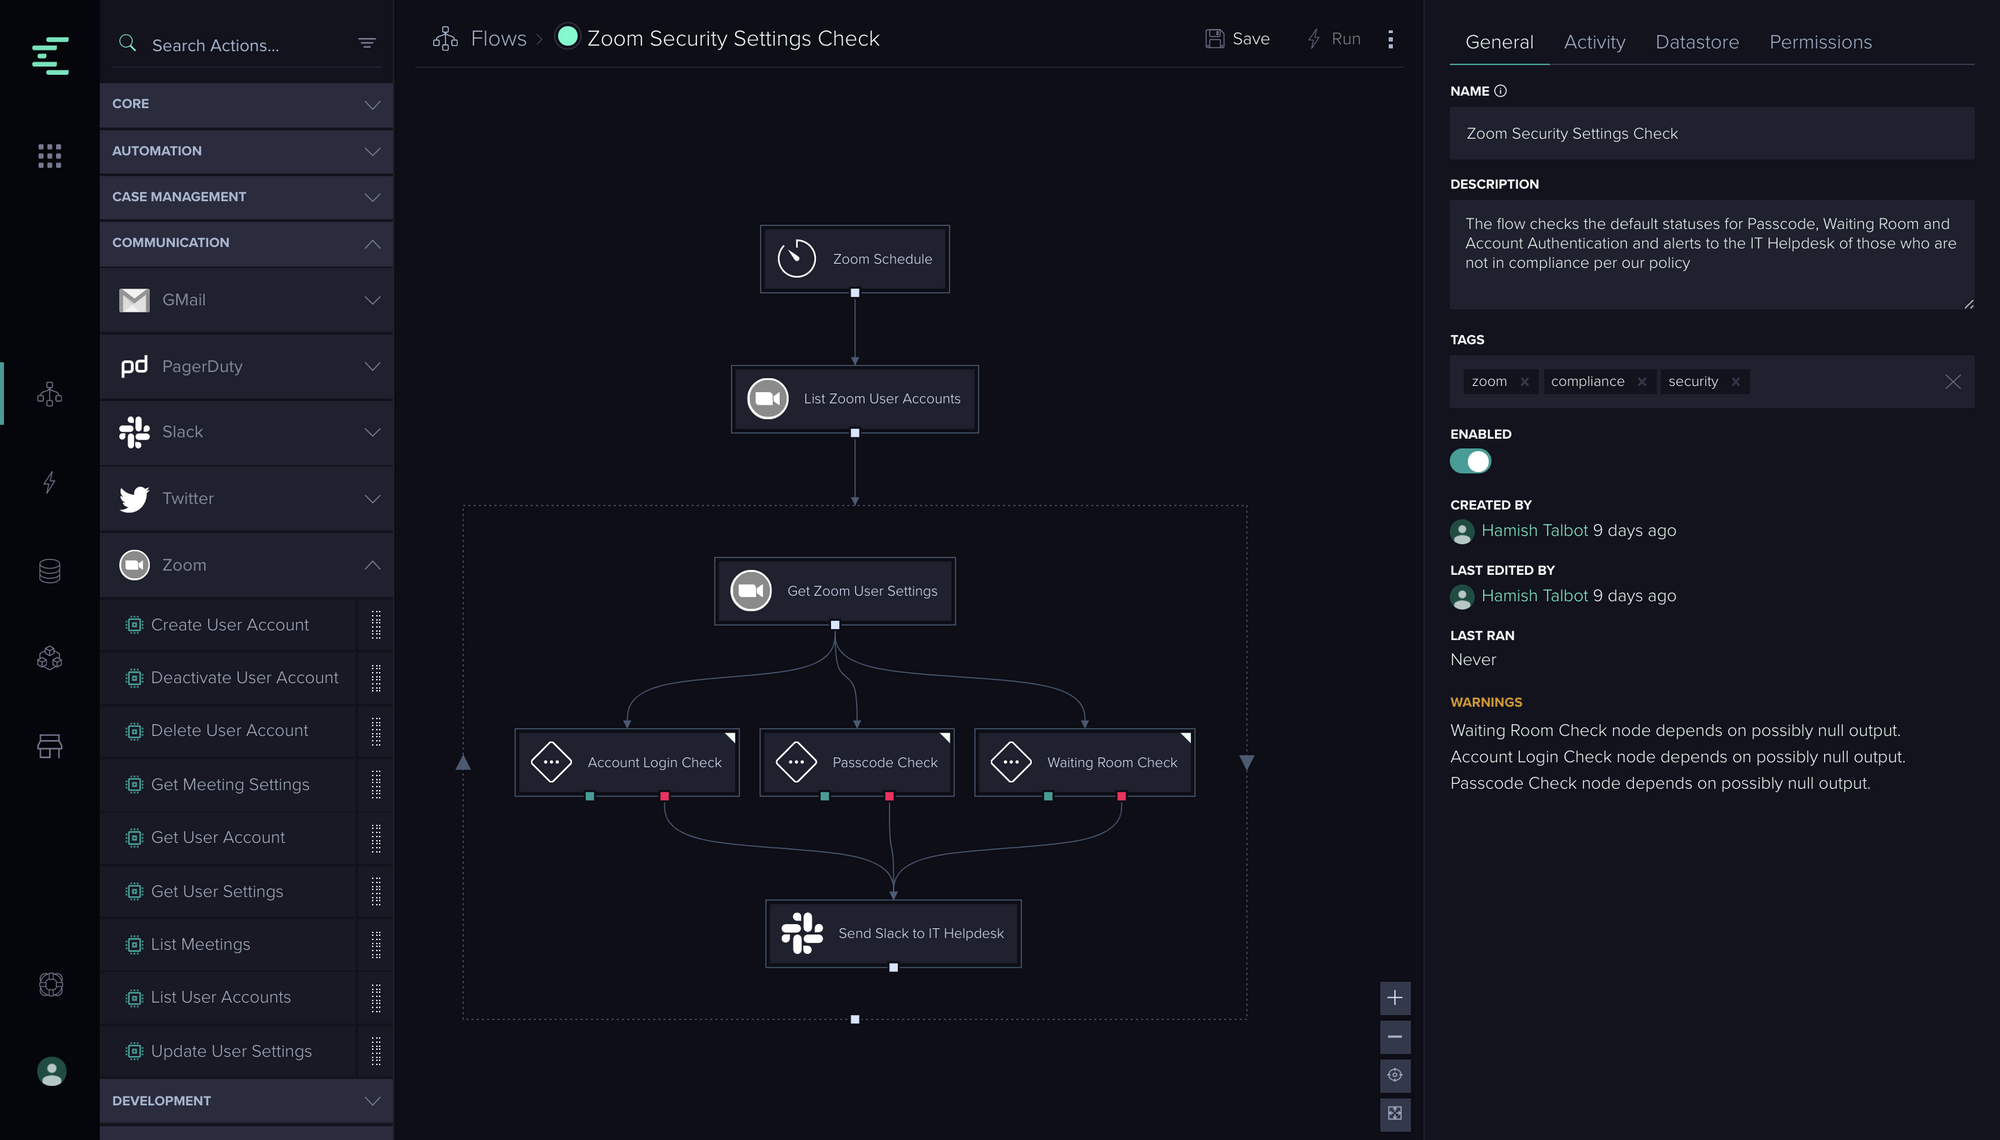
So here at CRFT, we have come up with an automated process to do exactly this! Wouldn’t it be great to have a process that checks this on a regular basis for you and alerts your IT Helpdesk upon discovery? Wouldn’t it be amazing if this service was free to utilize right now?
To solve this challenge, we’ve used our no-code automation platform to get this service up and running in minutes. Since it’s built with an intuitive approach, it’s easy to customize and pick your notification options, like Slack or email. It’s fully automated to alert you of non-compliant accounts… Curious how it works?
Five Simple Steps
- On a regular basis, the schedule starts off the automated flow.
- We pull all of your Zoom User Accounts.
- Then we push the user accounts into a loop that looks at the users’ default settings that we talked about above.
- We test whether the settings are enabled/in use.
- Finally, we send off alerts to an individual or a group for notification and/or remediation.
If you’d like to see this flow in action, as well as many others, come to say hello at https://crft.app.
